 NexBrowser指纹浏览器-官方博客Blog
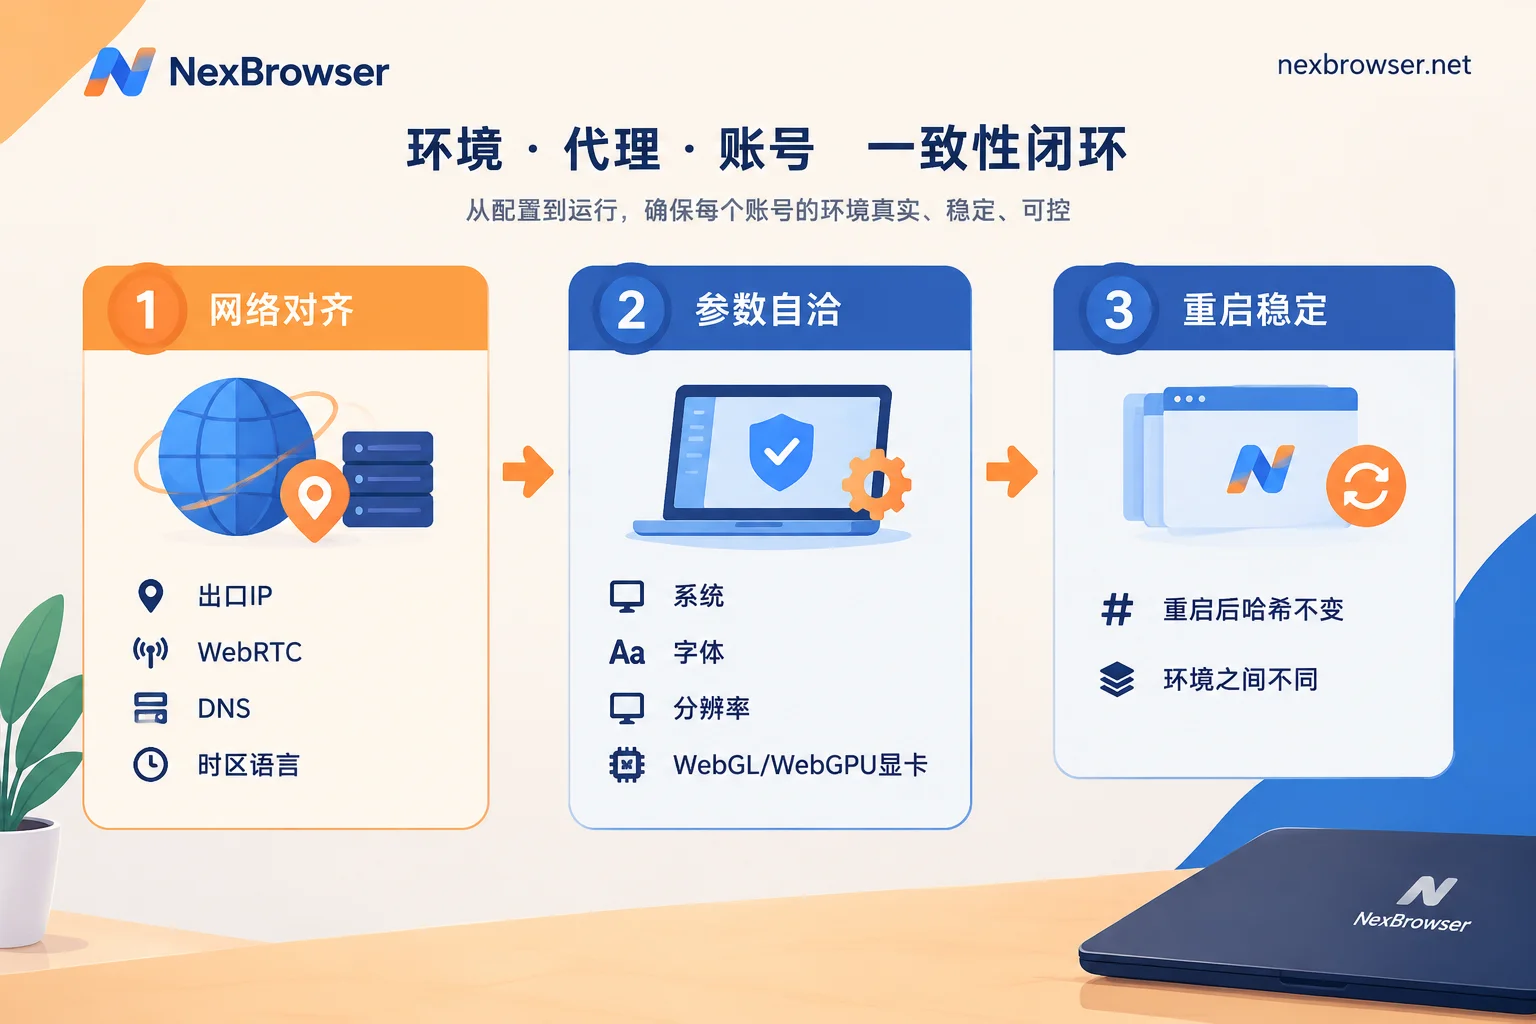
To judge whether an antidetect browser is effective, the key is not the score given by a detection site, but the following three things:
- Network layer alignment: Whether the exit IP, WebRTC, DNS, time zone, and language all point to the same region.
- Parameter self-consistency: Whether the declared operating system, fonts, resolution, and graphics card make sense together.
- Stability after restart: Whether the same environment retains its fingerprint when closed and reopened; and whether different environments can be distinguished.
All three must be tested in the environment you actually use, and you must bind the proxy before testing. Below, we explain why these checks are necessary and what to look for in each step. For basic concepts of fingerprints and whether multiple instances can be linked, see the basic guide; this article will not elaborate.
The Detection Approach Has Changed, So Self-Check Methods Must Change Too
In the past, a common countermeasure was randomization or adding noise: each time you open, the Canvas and WebGL hashes differ, making it look like a "different machine." Now, such practices have themselves become risk features. Risk control and anti-scraping systems like Cloudflare and Fingerprint focus more on whether multiple dimensions can cross-validate, and mainly catch three types of issues:
- Prototype chain tampering: If JavaScript directly overrides properties of objects like navigator, detectable traces remain on functions and prototype chains.
- Abnormal noise: The noise distribution in Canvas output differs from real devices.
- Rendering results inconsistent with declared hardware: For example, declaring a certain graphics card but the actual rendering characteristics do not match that card.
WebGPU introduces a new detection surface. Detection scripts can read shader compilation latency, compute performance benchmarks, and low-level GPU architecture information. These features are harder to spoof by simply rewriting front-end properties than WebGL renderer strings.
Therefore, the goal of self-checking needs adjustment: do not merely pursue "a unique-looking fingerprint," but confirm that the environment is consistent over time and internally consistent.
Before Testing: Set Up the Environment as You Would in Actual Use
Do not use your regular main browser to run detection sites, and do not test network items in an environment without a proxy bound; the results would be irrelevant to actual use.
In NexBrowser, each environment has independent cookies, cache, local storage, and proxy, and fingerprint parameters are configured individually per environment. Follow this order:
- Create or select the environment to check, and confirm that the system, language, and resolution in the fingerprint parameters meet your actual needs.
- Bind a proxy to this environment. Proxies support HTTP, HTTPS, SOCKS5 bulk import, and can also directly bind residential IPs. After binding, use the one-click test to confirm the proxy is reachable and note the exit region. For details, see binding proxies and verifying exit.
- Launch the environment and open the detection sites in sequence within the environment window.
It is advisable to record the following information: environment name, exit IP and region, time zone, language, Canvas and WebGL hashes, and the fingerprint ID given by CreepJS. These records will be needed later to judge stability.
First Checkpoint: Network Layer Alignment (Pixelscan / BrowserScan)
Pixelscan and BrowserScan are suitable for quick comprehensive checks. Focus on the following items:
- WebRTC: The IP shown on the page should match the proxy exit. If your real public IP appears, there is a leak and this environment should not be used.
- DNS: The region of the DNS server should roughly correspond to the exit. An exit in the US but DNS in China is a typical contradiction.
- Time zone and language: The system time zone, browser language, and IP region should match each other.
- Geolocation: If the site requests location permission, the returned location should not be too far from the IP.
When problems arise, address them at the source: before changing the exit, first change the time zone and language to follow the proxy region; WebRTC leaks should be handled back in the environment's WebRTC settings. It is not recommended to overlay rewriting plugins in the environment to cover up problems; such plugins are exactly what prototype chain detection most easily identifies.
Second Checkpoint: Parameter Self-Consistency (Mainly CreepJS)
CreepJS is an open-source deep testing page, with code hosted on GitHub. Its core is "Lies" detection and prototype chain integrity checks. When reading the results, note two points:
- Check whether there are entries in the Lies section. Entries indicate that some properties or API behaviors have been rewritten and left traces. Note which items they are and go back to the environment configuration to find the corresponding parameters.
- Do not aim for a perfect score. CreepJS itself is designed as a harsh stress test; even ordinary real browsers may not be all green. Focus on clear contradictions rather than the total score.
Then, combined with Pixelscan results, manually verify the following relationships:
- Declared Windows but the font list contains fonts only available on macOS.
- The ratio of screen resolution to available area is unreasonable.
- The graphics card shown by WebGL does not match the declared platform, e.g., an Apple GPU in a Windows environment.
- If the detection page can read WebGPU adapter information, check whether it belongs to the same hardware category as the WebGL graphics card.
Third Checkpoint: Stability and Isolation
This step is most easily overlooked but has the greatest impact on multi-account operations.
- Restart the same environment two or three times and compare the hashes and fingerprint ID recorded earlier. If they differ each time, the parameters are being randomized. This not only makes you easier to identify but may also cause the platform to think the device changes frequently, leading to session resets.
- Different environments must be distinguishable. Randomly pick two environments and compare; their hashes should not be identical. Environments copied in bulk from a template especially need spot checks. For how to fix a baseline in a template while keeping fingerprints independent, see how to save browser environments as templates for bulk copying.
How to Use the Results and When to Retest
Passing all three checkpoints only means that leaks and contradictions detectable by public detection sites have been ruled out. Risk control rules of various platforms are mostly closed-source and dynamically updated; detection sites cannot fully simulate them. Therefore, no configuration can guarantee that accounts will not be linked or restricted. The purpose of detection is to fix obvious problems before putting the environment into business use.
Retesting is recommended in the following cases:
- After changing proxy or exit region;
- After modifying fingerprint parameters;
- After updating the client or browser kernel;
- After copying a batch of new environments from a template, at least spot-check a few.
If you have just installed the client and the first environment is not yet working, you can first complete basic configuration by following download, install, and get the first environment running, then come back to these three checkpoints.
Finally, a reminder: the above methods are only for isolating and managing accounts you legally own. Actions explicitly prohibited by platforms should not be bypassed through environment configuration.




Comments(0)