 NexBrowser指纹浏览器-官方博客Blog
The correct way to connect Selenium to an anti-detection browser is not to have the script "launch" the browser, but to "take over" the already running environment through a debugging port. Many teams hit the same pitfall on their first attempt: writing webdriver.Chrome() directly in the script, causing Selenium to spawn a brand-new Chrome process. This process uses a fresh user-data-dir (the directory where the browser stores login state, cookies, and configuration), lacking the fingerprints, cookies, and login state maintained in the environment. It's equivalent to starting from scratch, negating isolation and anti-association efforts. In August 2026, competitors like RoxyBrowser and Yundeng launched MCP and Agent interfaces, pushing the industry toward standardized automation integration, but under the hood, the chain still relies on Local API and debugging ports. Hence, this tutorial on configuring Selenium to connect to anti-detection browsers remains an essential foundation for beginners.
Understand the Two Connection Methods: Script Launches Browser vs. Take Over an Existing Window
Many teams hit the same pitfall on their first attempt: writing webdriver.Chrome() directly in the script, causing Selenium to spawn a brand-new Chrome process. This process uses a fresh user-data-dir, lacking the fingerprints, cookies, and login state maintained in the environment, rendering isolation and anti-association ineffective.
The criterion is simple: if you need to operate on an anti-detection environment with pre-configured account info, you must use the "takeover" mode—let the script connect to the environment's already-open window via the debugging port. This is also the essence of the question "how does Selenium connect to an already-open window of a fingerprint browser."
Step 1: How to Get the Debugging Address and Port from the Fingerprint Browser's Local API
The standard flow is: first, launch the target environment in the anti-detection browser client via the local API using the environment ID. The API returns a loopback address and debugging port (like 127.0.0.1:端口). This port is dynamically assigned per launch and cannot be hardcoded, so the script must read it from the API response rather than hardcode it.
The critical part of "how to fill in the debugging port for WebDriver to connect to a fingerprint browser" is to put the address and port from the API response into the debuggerAddress (Selenium's debugging address parameter for indicating which already-open browser to take over) of ChromeOptions, not to guess randomly. The specific field names and response format vary by tool, so refer to your anti-detection browser's official documentation.
Step 2: Align the ChromeDriver Major Version with the Environment's Kernel Major Version
ChromeDriver's major version must strictly match the Chromium kernel major version that the anti-detection browser actually loads. For example, if the environment kernel is Chrome 151, you need ChromeDriver 151.x; otherwise, you'll get an error like session not created: This version of ChromeDriver only supports Chrome version X at startup.
Chromium's release cadence is fast, and even a minor version mismatch can cause connection issues. So, it's recommended to incorporate a driver version check into the script's pre-launch self-test logic: first query the environment's kernel version, then compare it with the local ChromeDriver version, and prompt for an update if they don't match. If you encounter a ChromeDriver version mismatch with the fingerprint browser's kernel, start by checking this step; it will save you most debugging time.
Step 3: How Selenium Connects to an Already-Open Window (Reuse Session Instead of Creating New user-data-dir)
The core of takeover mode is: point ChromeOptions' debuggerAddress to the debugging port of the already-started environment, and attach to the current session via the Chrome DevTools Protocol (CDP). This way, the script operates on the window inside the environment without generating a new Profile, keeping login state and local storage within the environment.
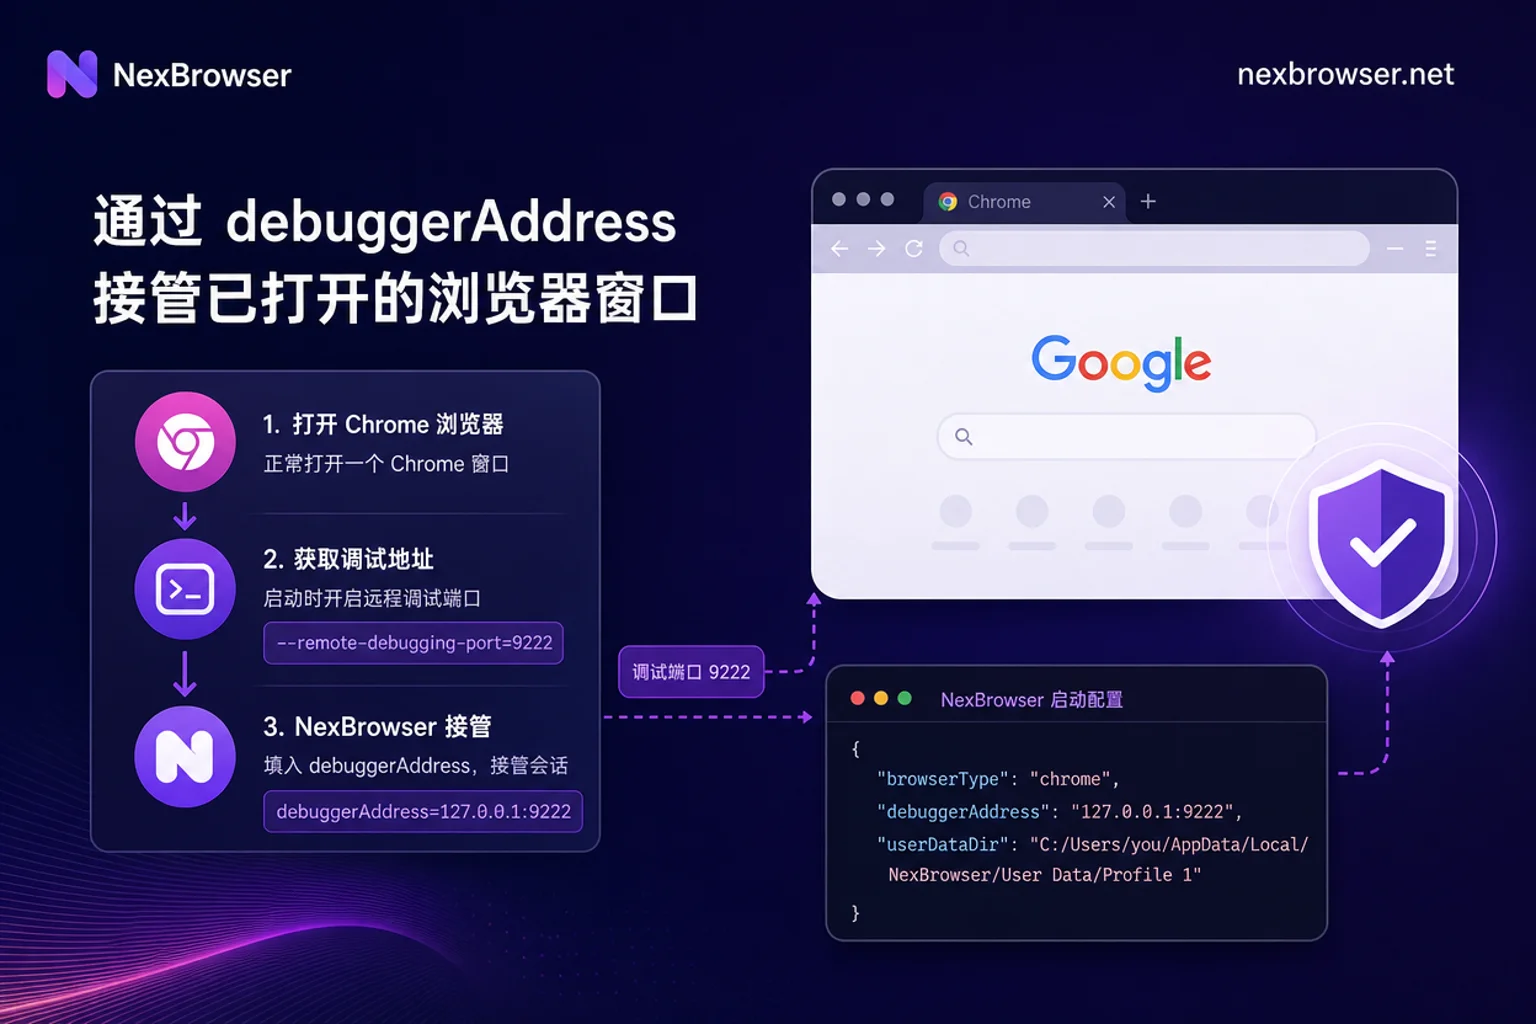
At this point, avoid adding any parameters that would cause a new instance to be created, such as --user-data-dir, --remote-debugging-port, etc., as they could interfere with the takeover or unexpectedly open a new window. By doing so, the script operates on the already-logged-in window within the environment, not a fresh blank instance.
Step 4: Ensure Proxy Assignment and Fingerprint Declaration Are Not Overridden by the Script
Many operators ask "why isn't the proxy working after Selenium starts," which is often because they passed parameters like --proxy-server in the script. In takeover mode, the proxy and fingerprint parameters (Canvas, Audio, User-Agent, etc.) are managed uniformly by the environment. Passing these startup parameters from the script either gets ignored or conflicts with the environment, breaking isolation.
The correct approach is: the script only handles page operations, leaving proxy and fingerprint management to the environment. For how to bind the proxy on the environment side, refer to Proxy IP Binding to Browser; for troubleshooting when the exit IP doesn't match, see Common Mistakes and Troubleshooting for Fingerprint Browser Independent IP Configuration. During runtime, verify that the exit IP matches the environment's declaration and check that the User-Agent in request headers hasn't been altered by the script. If consistent, the proxy assignment is normal.
Layered Troubleshooting for Four Types of Connection Errors: Port / Driver / Session / Network Assignment
This tutorial on Selenium connecting to anti-detection browsers categorizes common connection failures by layer for faster troubleshooting:
| Layer | Symptom | Verification Action | Resolution |
|---|---|---|---|
| Port | Connection refused or timeout | Check if the environment is running and the port is still valid | Re-fetch the dynamic port via API; don't hardcode |
| Driver | session not created | Verify ChromeDriver version | Download a driver matching the kernel major version |
| Session | Operation not targeting the desired environment | Check if a new window was opened | Ensure takeover via debuggerAddress and remove extra startup parameters |
| Network | Exit IP not as expected | Compare with the environment's declared proxy IP | Remove proxy parameters from the script and let the environment manage them |
Competitors Launching MCP and Agent Interfaces: What It Does and Doesn't Mean
In August 2026, RoxyBrowser released V4.0.0, and Yundeng launched the MCP cloud open platform interface, both starting to support large models directly scheduling fingerprint browsers. This indicates automation integration is shifting from "hardcoded scripts" to "standard interface scheduling," which is beneficial for teams.
However, it does not change the underlying requirements of debugging ports, driver versions, or session reuse, nor does it imply that competitors' MCP interfaces are more secure or harder to detect. From public information, these interfaces still require starting the environment and establishing a debugging connection; the specific implementation should be referred to in each vendor's official documentation.
Implementation in NexBrowser: Local API to Start Environment + WebDriver Takeover
Using NexBrowser as an example, the implementation is straightforward: first, use the Local API to start the target environment by environment ID, obtain the debugging address and port, then hand over to Selenium/WebDriver for takeover. Proxy management, fingerprint isolation, cookie and cache isolation are all maintained by the environment side; the script need not and should not redeclare them. For deeper understanding of environment configuration, refer to Fingerprint Browser Configuration Tutorial and How to Choose a Fingerprint Browser.
For non-technical teams that don't want to code, you can use no-code RPA or window synchronization features to achieve similar operations, though with less flexibility. Script takeover remains the preferred choice for deep automation operations.
One-Page Checklist for Interface Configuration and Capability Boundaries
Condensing this entire tutorial into the checklist below will help you avoid most connection issues:
- [ ] Environment started via Local API
- [ ] Debugging port dynamically obtained from API response, not hardcoded
- [ ] ChromeDriver major version matches environment kernel major version
- [ ] Takeover via debuggerAddress without adding parameters that create new instances
- [ ] Script does not pass proxy parameters redundantly
- [ ] Exit IP matches the environment's declared proxy
- [ ] User-Agent and other fingerprints not altered by script
- [ ] On connection failure, troubleshoot by port/driver/session/network layers
Finally, clarify the boundary: interface takeover solves operational efficiency and environment consistency, not circumventing platform detection. Ensure automation usage complies with platform rules; do not use it for mass registration or traffic manipulation.
FAQ
Where does the debugging port come from when Selenium connects to a fingerprint browser?
The debugging port is not something you fill in randomly; it is a dynamic port returned by the local API of the anti-detection browser after you launch the environment. The script should read the port from the API response, not hardcode it.
If I get "session not created," is it always a driver version issue?
In most cases, yes. First, check whether the ChromeDriver major version matches the environment kernel major version; for example, kernel 151 requires driver 151.x. If versions are correct, then check if the environment is running and the port is valid.
Can I still pass proxy parameters in the script after takeover?
Not recommended. In takeover mode, the proxy is managed by the environment. Passing parameters like --proxy-server may cause the proxy to fail or conflict. To verify the proxy is working, simply compare the exit IP with the environment's declared proxy IP.
Which is more convenient for taking over a fingerprint browser: Selenium or Puppeteer?
Both can take over via CDP. Selenium has a more mature ecosystem with more resources for team onboarding; Puppeteer is lighter but requires more low-level coding. The choice depends on your team's tech stack, but the configuration approach is the same.
Does the port change every time the environment starts?
Yes, the port is usually dynamically assigned and may change with each launch. Therefore, the script must dynamically fetch the port and not hardcode it; otherwise, it will fail to connect on subsequent runs.


Comments(0)